ESP8266 Lua/NodeMCU module for Sensirion SEN5x PM sensors
esp8266-nodemcu-sen5x contains an ESP8266 NodeMCU Lua module as well as
MQTT / HomeAssistant / InfluxDB integration example (init.lua) for
Sensirion SEN5x particulate matter, VOC, and NOx sensors.
Dependencies
sen5x.lua has been tested with Lua 5.1 on NodeMCU firmware 3.0.1 (Release 202112300746, integer build). It requires the following modules.
- i2c
- bit
The MQTT HomeAssistant integration in init.lua additionally needs the following modules.
- gpio
- mqtt
- node
- tmr
- uart
- wifi
Setup
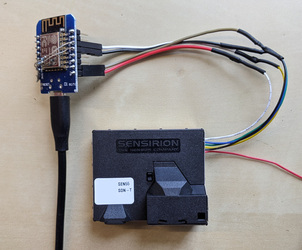
Connect the SEN5x board to your ESP8266/NodeMCU board as follows.
- SEN5x GND → ESP8266/NodeMCU GND
- SEN5x 5V → 5V input (note that the "5V" pin of NodeMCU or D1 mini dev boards is connected to its USB input via a protective diode, so when powering the board via USB the "5V" output is more like 4.7V. For SEN5x, this is sufficient.)
- SEN5x SCL → NodeMCU D1 (ESP8266 GPIO4)
- SEN5x SDA → NodeMCU D2 (ESP8266 GPIO5)
SDA and SCL must have external pull-up resistors to 3V3.
If you use different pins for SDA and SCL, you need to adjust the softuart.setup call in the examples provided in this repository to reflect those changes. Keep in mind that some ESP8266 pins must have well-defined logic levels at boot time and may therefore be unsuitable for SEN5x connection.
Usage
Copy sen5x.lua to your NodeMCU board and set it up as follows.
sen5x = require("sen5x")
i2c.setup(0, sda_pin, scl_pin, i2c.SLOW)
sen5x.start()

-- can be called with up to 1 Hz
function some_timer_callback()
    if sen5x.prepare_read() then
        local delayed_read_data = tmr.create()
        delayed_read_data:register(20, tmr.ALARM_SINGLE, read_data)
        delayed_read_data:start()
    end
end

function read_data()
    if sen5x.read() then
        print(string.format("PM1: %d.%01d µg/m³", sen5x.pm1/10, sen5x.pm1%10))
    end
end
Application Example
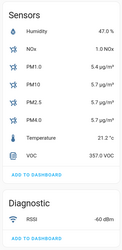
init.lua is an example application with HomeAssistant integration. To use it, you need to create a config.lua file with WiFi and MQTT settings:
station_cfg.ssid = "..."
station_cfg.pwd = "..."
mqtt_host = "..."
Optionally, it can also publish readings to an InfluxDB. To do so, configure URL and attribute:
influx_url = "..."
influx_attr = "..."
Readings will be stored as sen5x,[influx_attr] pm1_ugm3=...,pm2_5_ugm3=...,...

